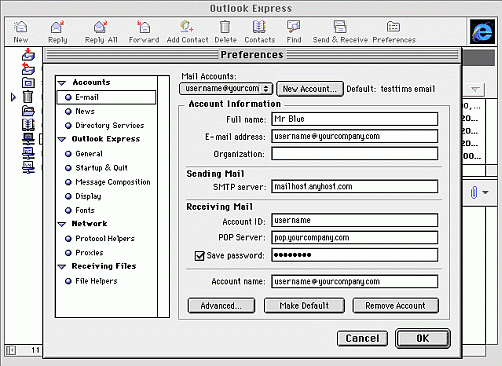
| Starting ApplicationLaunch Outlook Express. Next Click on the Preferences button on the tool bar or click on the Edit menu option at the top of the screen and select Preferences. Click on E-mail from the list on the left hand side of the new window that pops up (Fig. 1.) ( Figure 1 ) |
| Creating New AccountTo create a new account within Outlook Express:1. click on the New Account button located on the right 2. in the Account name box, type in the email address you want to set up 3. make sure the Account type is set to POP 4. click on the OK button |
| Adding Informationsin the Full name box you would normally type in your name in full but you can type in anything you like, using any mixture of uppercase, lowercase, space characters etc, however, it will appear next to your email address in every email message you send out
in the E-mail address box, type in your email address
in the SMTP Server leave the original server
in the Account ID box, type in your username for this email account, normally, this will be the name that goes in front of the @yourcompany.com part of your email address and must be spelt using lowercase characters only
in the POP Server box, add name of Pop3 server you're received from us
if you don't want to have to type in your password each time you want to check for new email, click on Save password so that it does have a tick and then carefully type in your password in the box to the right of it
the Account name box should contain your email address
|
| Additional InformationsYour new account is now setup and ready to use but you might want to make sure the following options are also set...click on Message Composition listed on the left
we suggest setting both Mail sending format and News sending format to Plain text
click on Reply to messages using format in which they were sent so that it does have a tick
click on Use internet standard style replies so that it does have a tick
click on Attachment encoding and make sure it's set to Base64
click on Proxies listed on the left
and ensure the item labelled Disabled has a black dot next to it Proxies are not used when email is involved
finally, click on the OK button to finish |